SegNet学习及实现

  1. 1. SegNet学习及实现
    1. 1.1. 简介
    2. 1.2. 网络结构
      1. 1.2.1. 编码器结构
      2. 1.2.2. 解码器结构
      3. 1.2.3. SegNet和DeconvNet,U-Net的对比
    3. 1.3. SegNet的几个变体
      1. 1.3.1. SegNet-Basic
      2. 1.3.2. FCN-Basic
      3. 1.3.3. SegNet-Basic-EncoderAddition
      4. 1.3.4. FCN-Basic-NoAddition
      5. 1.3.5. SegNet-Basic-SingleChannelDecoder
      6. 1.3.6. FCN-Basic-NoDim-Reduction
    4. 1.4. 代码
    5. 1.5. 结果
    6. 1.6. 参考资料

SegNet学习及实现

SegNet原论文中比较长,实验比较多,主要是SegNet各种变体,变体之间的比较,FCN的比较等等的实验。这里简单记录一下笔记。

简介

​ 常见的分割方法都是直接将分类的架构直接转为图像分割的结构。虽然效果还不错,但是结果还是较为粗糙,主要原因是最大池化和子采样,降低了特征图的分辨率。然后提出了SegNet,SegNet将低分辨率特征映射为输入分辨率用于像素级分类,这种映射产生对边界精确定位有用的特征。

​ SegNet设计是用于道路场景理解,需要有几种能力:对于外观建模(建筑、道路),形状(汽车、行人),了解空间联系(上下文)。大多数像素属于一个大的类别,网络必须进行平滑分割,也需要有基于物体的形状进行刻画的能力,不论是小物体还是大物体。因此保留边界信息十分重要。

算法结构: 提出SegNet网络,为encoder和decoder对称的结构的一个网络,最后有一个用于pixel-wise的分类层。

文章亮点: decoder在上采样的时候,直接使用对应encoder中经过max Pool之后保留的池化索引,进行非线性上采样。

比较结果: 通过比较SegNet与FCN,DeepLab-LargeFOV,DeConvNet结构,统筹内存与准确率,SegNet实现了很好的分割效果。

网络结构

SegNetArchitecture

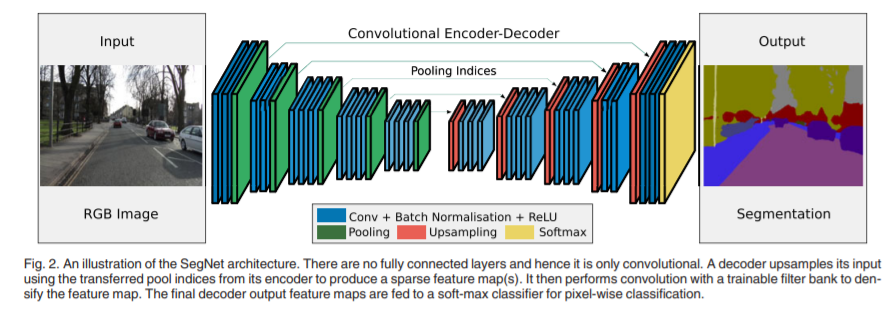
整个SegNet是一个对称结构,一个Encoder对应一个Decoder。许多分割网络都是下采样阶段都是使用的经典的分类网络,不同的只是编码器部分。

编码器结构

SegNet的编码部分和VGG16是相同的,使用了VGG16的前13层,移除了全连接层,由于移除了全连接,参数量减少,更易于训练。

解码器结构

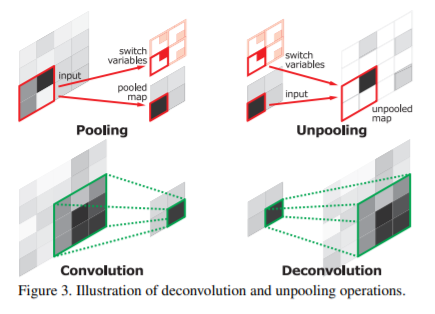
解码器是关键部分,每一层网络都对应一层encoder,也就是13层,最后再加一层分类层。这里上采样使用了反池化,反池化就是池化的时候保存一个池化索引,反池化的时候将索引和输入图传入,将输入图还原到对应位置进行反池化。

UnPooling

反池化的几个优势:

  1. 提高边界刻画能力
  2. 在端到端训练减少参数量
  3. 这种上采样的形式可以组合到任何一种编码解码结构中。

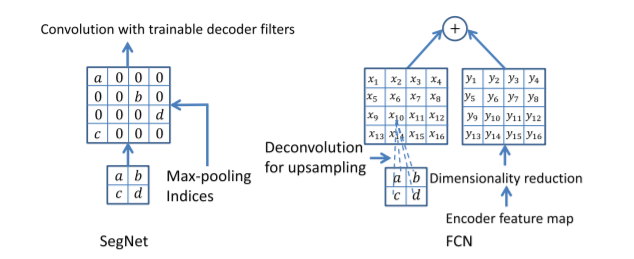
反池化之后,这个过程是不需要学习的。后面在接上卷积层进行学习,将反池化之后的稀疏图变得更加密集。

SegNet和DeconvNet,U-Net的对比

DeconvNet有更大的参数量,需要更多的计算资源,难以进行端到端的训练。主要因为有全连接。

U-Net没有重复使用池化索引,将特征图传到上采样中的,消耗了更多内存。作者认为U-Net较浅,没有SegNet深,效果不如SegNet。

SegNet的几个变体

很多分割架构都是共享相同的编码器网络,只是解码器不同而已。因此使用的VGG16,使用FCN作为比较对象。

SegNet-Basic

这是一个小版本的SegNet,有4个encoder和4个decoder。解码器没有使用Bias和Relu。卷积核改为了7x7,保证感受野足够大。

FCN-Basic

与SegNet-Basic编码器相同,解码器使用FCN的解码。用于对比实验。如上图,SegNet的反池化和FCN的转置卷积的区别。

SegNet-Basic-EncoderAddition

添加了64编码器特征图到每一个对应的输出特征图中,做特征融合。创建一个消耗更多内存的版本。学习的FCN的方式。

FCN-Basic-NoAddition

FCN要求在推理过程中存储特征图,对嵌入式设备不太友好。这里放弃了存储特征,也是用来对比。

SegNet-Basic-SingleChannelDecoder

一种小的变体,解码器的滤波器是单通道的。只对其相应的上采样特征图进行卷积。大大减少了可训练参数的数量和推理时间。结果并不好。

FCN-Basic-NoDim-Reduction

FCN-Basic的变体,没有进行编码器降维操作,不做压缩。

代码

1
2
3
4
5
6
7
8
9
10
11
12
13
14
15
16
17
18
19
20
21
22
23
24
25
26
27
28
29
30
31
32
33
34
35
36
37
38
39
40
41
42
43
44
45
46
47
48
49
50
51
52
53
54
55
56
57
58
59
60
61
62
63
64
65
66
67
68
69
70
71
72
73
74
75
76
77
78
79
80
81
82
83
84
85
86
87
88
89
90
91
92
93
94
95
96
97
98
99
100
101
102
103
104
105
import torch
import torch.nn as nn
import torchvision.models as model


# 解码器一个layer的生成, 3层的 or 2层的
def decoder(input_channel, output_channel, num=3):
decoder_body = None
if num == 3:
decoder_body = nn.Sequential(
nn.Conv2d(input_channel, input_channel, kernel_size=3, padding=1),
nn.Conv2d(input_channel, output_channel, kernel_size=3, padding=1)
)
elif num == 2:
decoder_body = nn.Sequential(
nn.Conv2d(input_channel, input_channel, kernel_size=3, padding=1),
nn.Conv2d(input_channel, output_channel, kernel_size=3, padding=1)
)
return decoder_body

class VGG16_SegNet(nn.Module):
def __init__(self, class_num= 12):
super(VGG16_SegNet, self).__init__()
vgg_pretrain = model.vgg16(pretrained=True)

# 设定池化层记录indices
pool_list = [4, 9, 16, 23, 30]
for item in pool_list:
vgg_pretrain.features[item].return_indices = True
# encoder部分
self.encoder1 = vgg_pretrain.features[:4]
self.pool1 = vgg_pretrain.features[4]

self.encoder2 = vgg_pretrain.features[5:9]
self.pool2 = vgg_pretrain.features[9]

self.encoder3 = vgg_pretrain.features[10:16]
self.pool3 = vgg_pretrain.features[16]

self.encoder4 = vgg_pretrain.features[17:23]
self.pool4 = vgg_pretrain.features[23]

self.encoder5 = vgg_pretrain.features[24:30]
self.pool5 = vgg_pretrain.features[30]

# decoder 部分
self.decoder5 = decoder(512, 512)
self.unpool5 = nn.MaxUnpool2d(2, 2)

self.decoder4 = decoder(512, 256)
self.unpool4 = nn.MaxUnpool2d(2, 2)

self.decoder3 = decoder(256, 128)
self.unpool3 = nn.MaxUnpool2d(2, 2)

self.decoder2 = decoder(128, 64, 2)
self.unpool2 = nn.MaxUnpool2d(2, 2)

self.decoder1 = decoder(64, class_num, 2)
self.unpool1 = nn.MaxUnpool2d(2, 2)

def forward(self, x):
# 下采样
size1 = x.size()
x = self.encoder1(x)
x, pool_indices1 = self.pool1(x)

size2 = x.size()
x = self.encoder2(x)
x, pool_indices2 = self.pool2(x)

size3 = x.size()
x = self.encoder3(x)
x, pool_indices3 = self.pool3(x)

size4 = x.size()
x = self.encoder4(x)
x, pool_indices4 = self.pool4(x)

size5 = x.size()
x = self.encoder5(x)
x, pool_indices5 = self.pool5(x)
# 上采样
x = self.unpool5(x, pool_indices5, size5)
x = self.decoder5(x)

x = self.unpool4(x, pool_indices4, size4)
x = self.decoder4(x)

x = self.unpool3(x, pool_indices3, size3)
x = self.decoder3(x)

x = self.unpool2(x, pool_indices2, size2)
x = self.decoder2(x)

x = self.unpool1(x, pool_indices1, size1)
x = self.decoder1(x)
return x

if __name__ == "__main__":
test = torch.rand((2, 3, 352, 480))
net = VGG16_SegNet()
test = net(test)
print(test.size())

结果

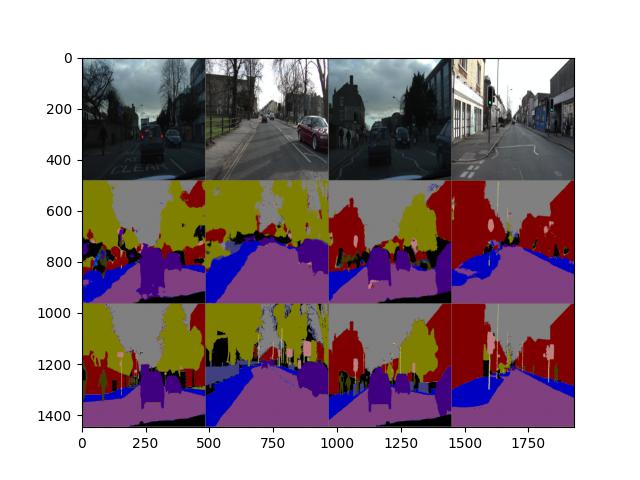
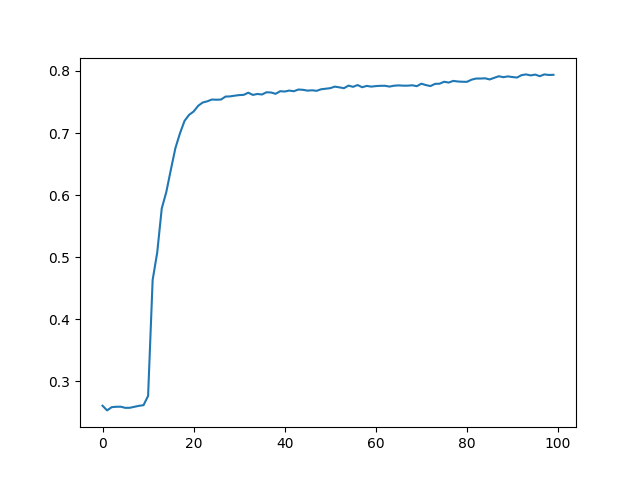
以下是自己跑的结果,优化器使用的Adam,学习率设定5e-6。跑的第197个epoch,以及mean IoU变化图。第一行是原图,第二行是网络输出,第三行是Ground Truth

参考资料

SegNet: A Deep Convolutional Encoder-Decoder Architecture for Image Segmentation

网络相关视频